The „External files in the media library“ plugin allows you to use files from various external sources. It also makes it possible to synchronize these files - even automatically. What this is all about is described here.
Background
Thanks to „External files in the media library“, you can connect a wide variety of sources for your files. You can also use the sources to automatically import files stored there into your media library. This has the advantage that you only have to store the files in the external source, but don't have to worry about importing them into your WordPress - the plugin does that for you.
Prerequisites
To use synchronization, you must identify the external source as such. save in your project. For each external source that you open, you can save it as such via a button at the top. It will then be available to you under Media library > Your external sources.
What is synchronized
The leading system for synchronization is always the external source.
If a new file is added there, it is automatically created as a new file in the media library and can be used in the project in future.
If a file is deleted in the external source, nothing is deleted in the media library. The reason for this is that any existing links within the project would be broken.
Settings for synchronization
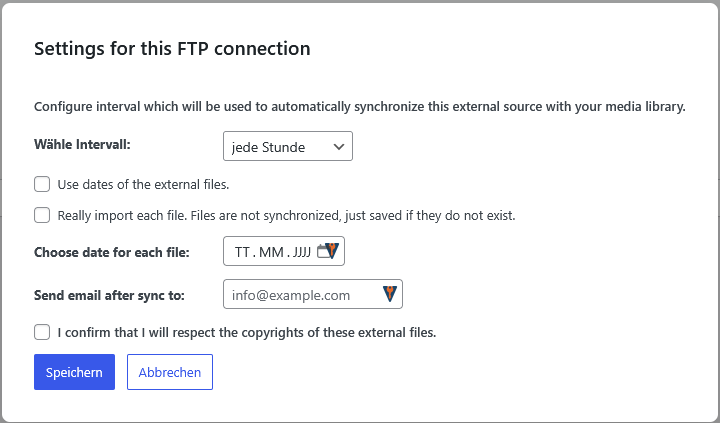
Under Media library > Your external sources, you will find a column called „Synchronization“ for each connection. There you can make settings for the connection, which can already be seen in the screenshot above.
Interval
Here you specify how often the synchronization should take place if it is to run automatically. If nothing is changed, it runs once an hour as soon as it is activated.
Send e-mail after synchronization
If an e-mail is specified here, an e-mail will be sent to the specified address each time after synchronization. This allows you to check whether, what and when synchronization has taken place. Please note that you must ensure that it is possible to send emails from within your project.
Select date for each file
Here you can specify that a specific date should be used for each file when saving. If nothing is specified, the current date is used unless the option to use the actual file date is activated.
Activate automatism
To activate the automatism, you only need to set the switch to „On“ in the „Synchronization“ column in the table of connections for the relevant connection. The synchronization will then run at the interval you have specified.
Synchronize manually
There is also a button to perform the synchronization immediately. This does not change the intervals if the automatism is activated.
View synchronized files
In addition to the „Synchronization“ column, there is also a „Synchronized files“ column in the table. Here you can see how many files have been synchronized per connection.
If there is at least one file, 2 links are displayed next to it:
- One that leads to the synchronized files of this connection being displayed in the media library.
- One to remove these synchronized files in the media library.
Note that if you remove synchronized files from the media library, you will also disrupt their integration in your project. If the files have been permanently selected somewhere, they are no longer available and could lead to incorrect displays.
Leave a Reply