By combining two plugins that I have developed, you can create your own website with a per FTPFTP File Transfer Protocol download list without having to use the backend regularly.
In addition to FTP, all other functions offered by the plugin External files in the media library supported sources. With the synchronization of files from external sources, the plugin offers a powerful tool for this use case.
Prerequisites
You need:
- The plugin Download list with icons.
- The plugin External files in the media library.
- FTP access where you store your files.
- A project with a block theme or a classic theme that supports blocks.
Preparations
- Install the two plugins mentioned above in your WordPress.
- Make sure that you have valid FTP access data. The best way to test this yourself is to log in from your computer with the data.
Implementation
The steps described here are divided into 2 sections: one is about setting up the list, the other is about synchronizing the files.
Configuration of the download list
- In the WordPress backend, go to Media library > Download lists.
- Add a new list there. Use a name under which you would find the list again. The name is not displayed publicly.
- Go to the page on which you want to display this list and edit it.
- Add a new block for the download list. In this block, go to „Select download list“ and click on the list you created in step 2.
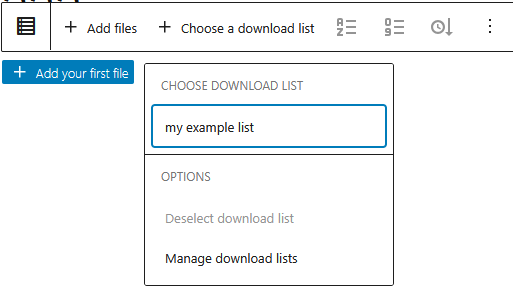
You will see an empty list in front of you, as we have not yet assigned any files to it. You can of course test this here and also adapt the formatting of the list to your requirements.
Configuration of the synchronization
Preparation
After installing „External files in the media library“, the synchronization of files is not activated by default. To activate it, proceed as follows:
- In your WordPress backend, go to Settings > External files in the media library > Synchronization.
- Check the box to activate support for synchronization and save this setting.
Furnishings
- In your WordPress backend, go to Media library > Add external files.
- Select „FTP“ as your source here.
Note: Of course you can also choose a different source here, depending on what you have available. - Enter your FTP access data in the form that is now displayed. Connect with these.
- It takes a moment until all data from the FTP directory is displayed.
- Now click on the „Save the directory as an external source“ button above.
Note: if you want to select your files in a single directory in the FTP directory, first select this directory on the left-hand side. - You will see a confirmation that the directory has been saved as an external source.
- Now go to Media library > Your external sources in the backend. Here you will see the directory you just saved in the list.
- Click on „Configure“ in the „Synchronization“ column of this entry. Here you will find an entry for selecting the initially created download list. You will recognize it by the name you used.
Select this list at the entry and save the settings. - As a test, you can now click on „Now“ in the entry in the Synchronization column. The plugin will connect via FTP, save the files from the FTP directory in the media library as external files and then assign them to the download list.
- To activate automatic synchronization, simply set the switch in the Synchronization column to „On“.
Frequently Asked Questions
Can I also use this with Elementor?
No, the above description only works with blocks as provided by WordPress. The plugin download list with icons only supports these.
Can I also use sources other than FTP?
Yes, you can use all external sources supported by the „External files in the media library“ plugin that allow synchronization. To do this, proceed as described above, but select the source you want.
The automatic synchronization does not do what it should - how can I stop it?
You can deactivate synchronization at any time in the following ways:
- Media library > Your external sources > Set the switch for synchronization to „Off“.
- Or: Settings > External files in the media library > Synchronization > Deactivate check mark
Leave a Reply